How to Export Office 365 Shared Mailbox to PST Using eDiscovery; Explained

Summary: In this writeup, we have provided a reliable solution to the user query, i.e. – How to Export Office 365 Shared Mailbox to PST File?” Moreover, we are also going to discuss the technical insights of the eDiscovery method to perform this operation. If you are also dealing with similar queries, then go through this guide to know the best way to execute the entire operation without any data loss or hassle.
Hello guys! Few months ago, I had imported PST to Shared Mailbox of Office 365 for an official purpose. When my procedure was successfully completed, I permanently deleted the source PST files. I don’t know what came into my mind that I erased Outlook data file. I had to keep it for backup purpose at a secondary location. So as of now, I want backup of Office 365 shared mailbox data. Please someone suggest me that how can I export Office 365 shared mailbox to PST file? Is it possible to do this or not? Please help me out!
More than 95% of Microsoft users back up their Office 365 shared mailbox to PST to keep their online data locally. The problem with these users is that they are unaware of the method of adding an Office 365 shared mailbox to Outlook. Whenever one imagines doing this sort of operation, he or she gets nervous with fear of data loss, a procedure hanging in between, or the rise of a new problem.
Therefore, here we came up with this post to assist Office 365 users on how they can export Microsoft O365 shared mailbox to Outlook PST file format easily. All the points and strategies are provided in this post to perform this respective procedure with all necessary requirements for the same. So let’s begin!
Instant Solution: If you want to effortlessly export Office 365 shared mailbox to PST, then Download the tool below:
Best Alternative to Export Office 365 Shared Mailbox to PST eDiscovery
- Step 1. Download, Install, & Run the Software.
- Step 2. Choose Mailbox Categories & Apply Filter.
- Step 3. Use Admin Credentials to Login & Validate.
- Step 4. Set Destination & Select PST File Size.
- Step 5. Select User Accounts & Click on Start Button.
Top 2 Methods to Export O365 Shared Mailbox to Outlook PST
In this blog, we will explain the top 2 solutions for exporting Office 365 shared mailboxes into PST files. Apart from backup, many users perform this operation for sharing data with Outlook users. The two solutions for such a process are:
Method 1: Using eDiscovery Tool to Export PST from Office 365 Mailbox
Microsoft provided a free inbuilt utility to its customers named as eDiscovery. It is purposely designed to determine and deliver electronic records and proves itself useful at the time of the forensic investigation. Administrators can use this product to search content in O365 mailboxes, Groups, Skype for Business, SharePoint Online, and many more. Clients can make use of content search tools to search all things through eDiscovery software.
Talking about its real reason for origination, then, it is used for O365 data searching for evidence and converting the search outcomes into PST file format for legal purposes. Keep one thing in mind you cannot term it as a sole approach for exporting Office 365 shared mailbox to PST because the intention behind this product origination is not this. Still, we can use eDiscovery for this sort of conversion procedure! First of all, you need to keep the following aspects in mind before proceeding with transferring Office 365 shared mailbox to PST :
- Administrative rights and controls are mandatory for an end-user.
- Your tenant should be an existing member of the Discovery Management Role Group.
- Make use of Internet Explorer 8 or above editions to perform this task.
- You can also use the Google Chrome browser with the installed ClickOnce add-in.
- Specific folder searching is prohibited still, you can prefer date-range searching.
- Microsoft .NET Framework 4.7 and Windows 7 or above OS are essential.
Once you have fulfilled all the prerequisites, begin with the procedure of exporting Microsoft Office 365 shared mailbox to PST using eDiscovery:
Step 1. Grant eDiscovery Permissions to User
a) Click on the https://protection.office.com link and sign in to your source Office 365 tenant.
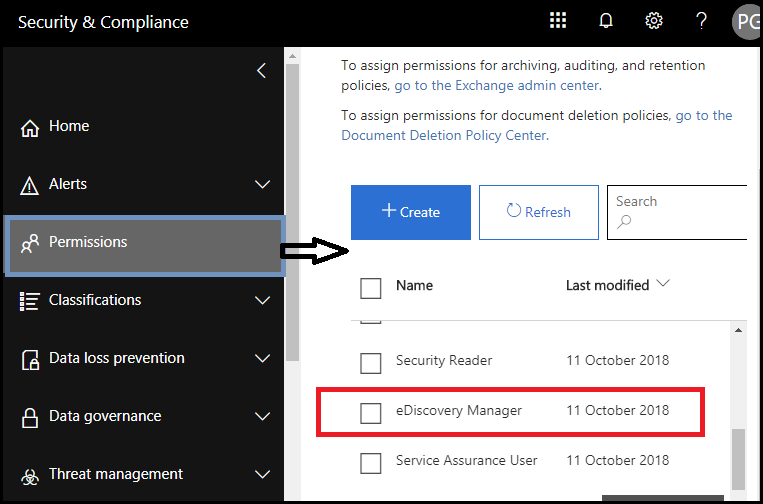
b) Open the Security & Compliance Center page in your account and click on Permissions >> eDiscovery Manager >> Edit role group.
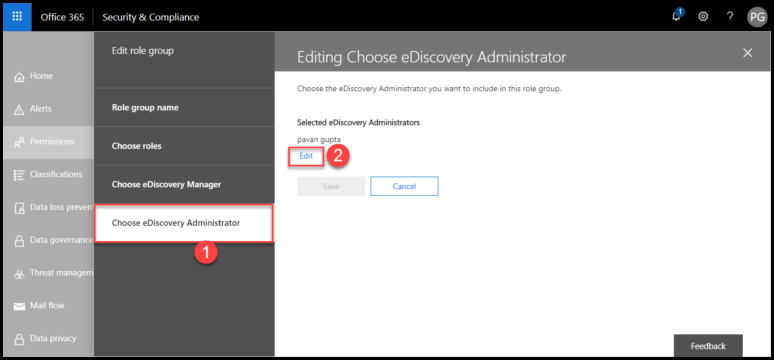
c) An Edit role group page appears in which you have to hit on the Choose eDiscovery Administrator option. Click on Administrator >> Edit >> + to create a new user as the eDiscovery Manager.
d) A list of members gets displayed in which you have to check the checkbox of that user whom you want to make the manager. Enable the checkbox and click on the Add button for Office 365 export shared mailbox to PST.
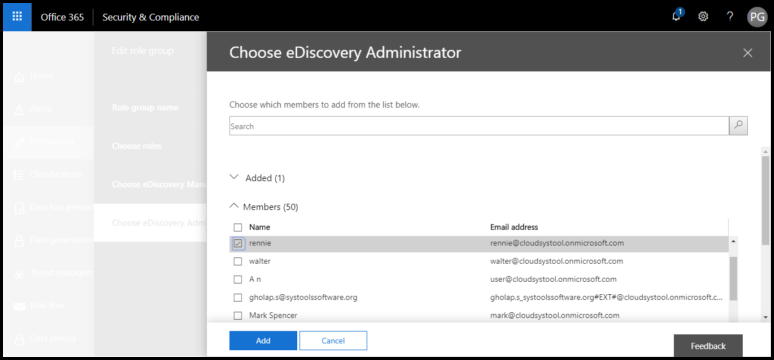
Note – Here in this process, we are considering Rennie as a member, to whom we are going to give a lot of eDiscovery permissions.
Step 2. It is Time to Create a New eDiscovery Case
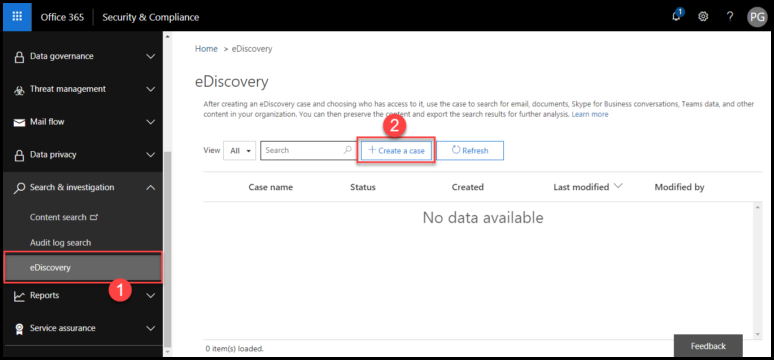
a) In the same Office 365 tenant, go back to the Security & Compliance Center page and click on Search & Investigation >> eDiscovery >> Create a case
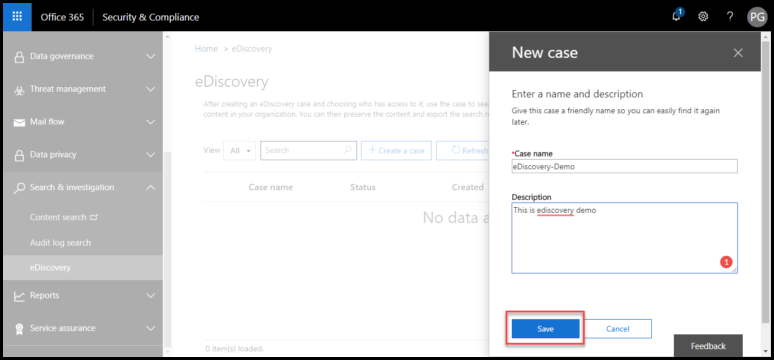
b) Mention any of your desired names in the section of the Case name and give a short description of it in the Description. Click on Save to continue with adding Office 365 shared mailbox to Outlook format.
Step 3. Add The Member to the New Case
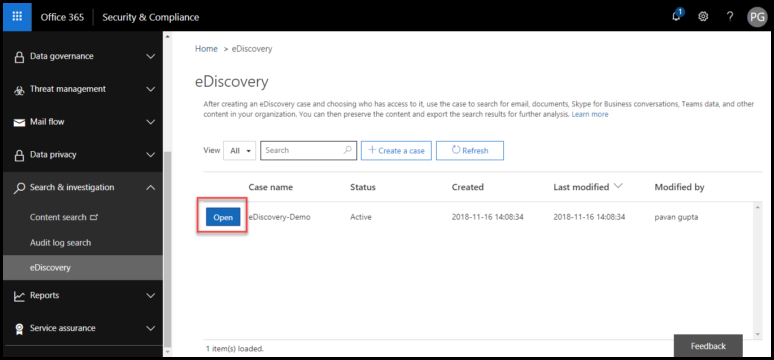
a) Again, go back to the Security & Compliance Center page in the same Exchange Online tenant and click on Search & Investigation >> eDiscovery to generate the cases list in the organization.
b) In this list, you are going to find a newly created case that is to be added to members. Click on the Open button of this case to Export Office 365 Shared Mailbox to PST.
c) Continue with Office 365 export shared mailbox to PST by clicking on the Add button of Manage Role Group. This is done to impose a new role group on the case.

d) After doing all this, click on the Save button to save the changes. At this stage, a user mailbox can execute eDiscovery on the new case, which is shared with the Rennie mailbox) After doing all this, click on the Save button to save the changes. At this stage, a user mailbox can execute eDiscovery on the new case, which is shared with the Rennie mailbox
Step 4. Now Attempt Content Searching
a) Navigate towards Security & Compliance center and click on Search & Investigation >> eDiscovery
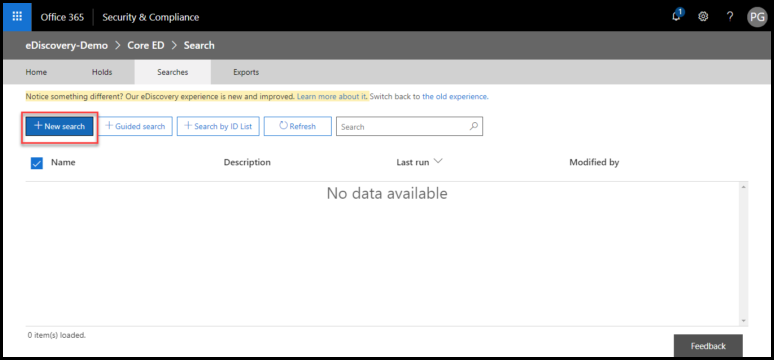
b) Select the case in which searching needs to be performed and then, Hit on Open button. Click on the Search tab and hit on the New Search button to Export Office 365 Shared Mailbox to PST.
c) This opens a page where you can append keywords for creating search queries.
d) In the field Under the locations, select the content path, which you have to search
e) Choose the option of Specific Location for selecting the mailboxes and sites, which you desire to search.
f) Click on the Modify option to display the list of locations.
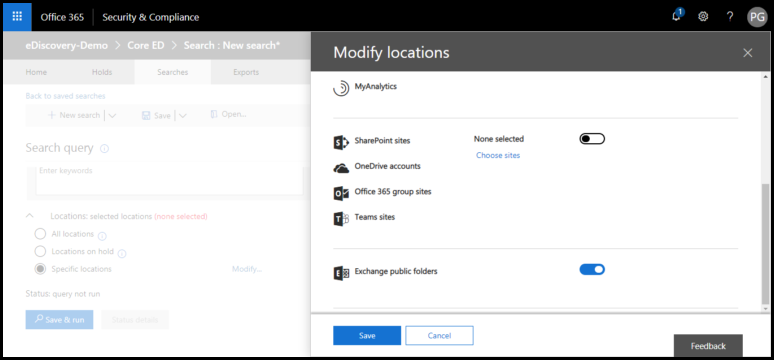
g) Now look for any groups, users, teams, and sites located in your Exchange Online account
h) Continue the procedure of exporting O365 shared mailboxes to PST by choosing all public folders available in your enterprise.
i) Once completed with Step (h), click on the Done >> Save button to perform Office 365 export shared mailbox to PST.
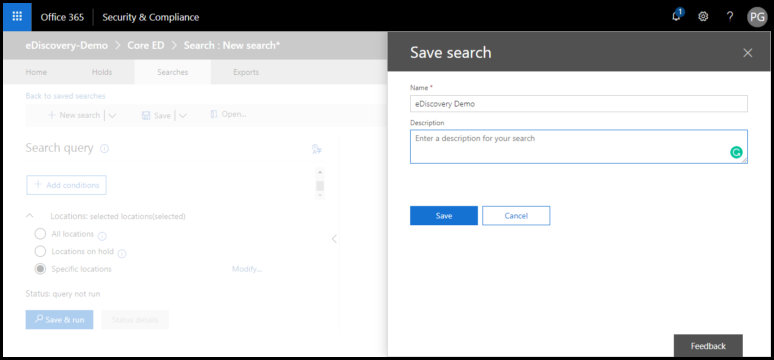
j) This opens a Searches tab in which you have to update all the defined settings in the account by clicking on Save & Run.

k) In the Name section, type any of your desired names for this searching operation, and then, click on the Save button to proceed.
Step 5. Export Search Results to Save Office 365 Shared Mailbox to PST File
When the searching procedure is completed, it is time to download or export search results of O365 content with the help of the following guidelines :
a) Go back to the Security & Compliance Center of your O365 account and then, click on Search & Investigation >> eDiscovery
b) Choose the search option from the list, that is to be exported, and then, hit on Open button
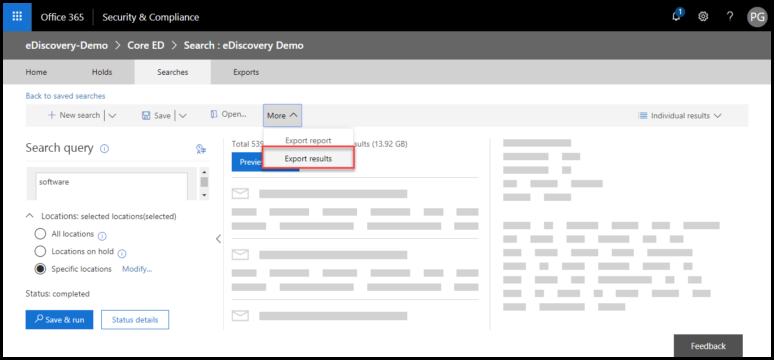
c) Click on the Searches tab and from the displayed list, select the searches you desire to export
d) Hit on the More drag-down menu and then on the Export results option to begin execution of the procedure to export Office 365 shared mailbox to PST.
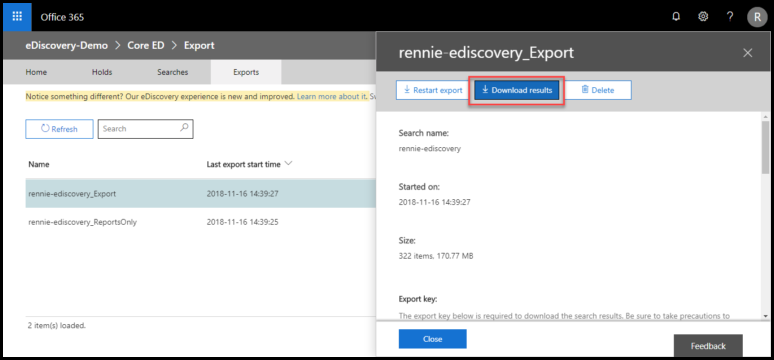
e) Next comes clicking on the Export tab and then, Hitting on the desired ‘Search result’
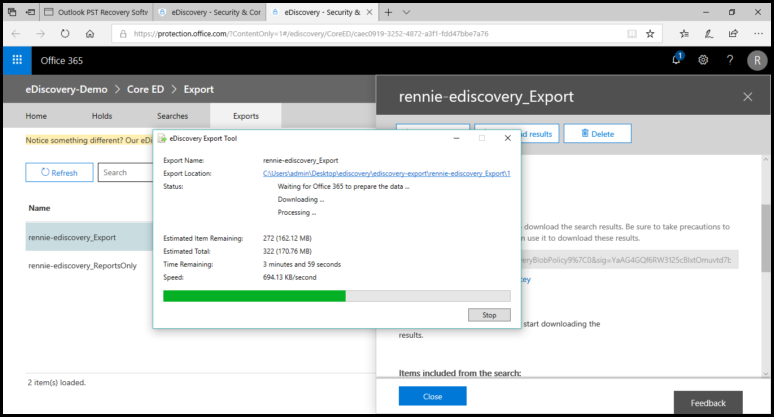
f) A side window gets launched in which you have to hit on the Download results option.
g) Now opens an eDiscovery Search Tool window where you have to copy the Export key and paste it into the pop-up screen.
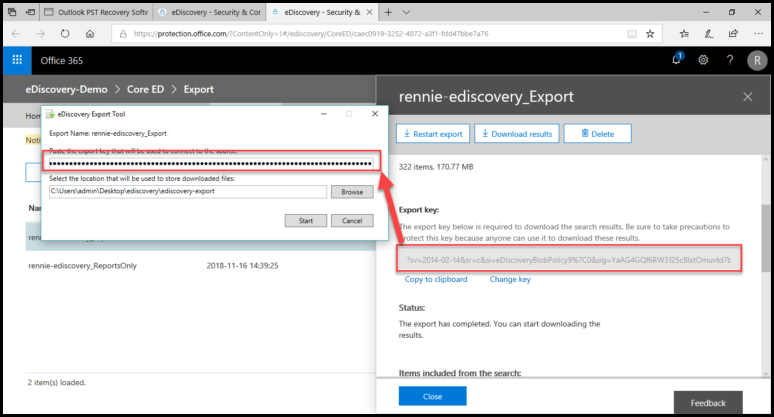
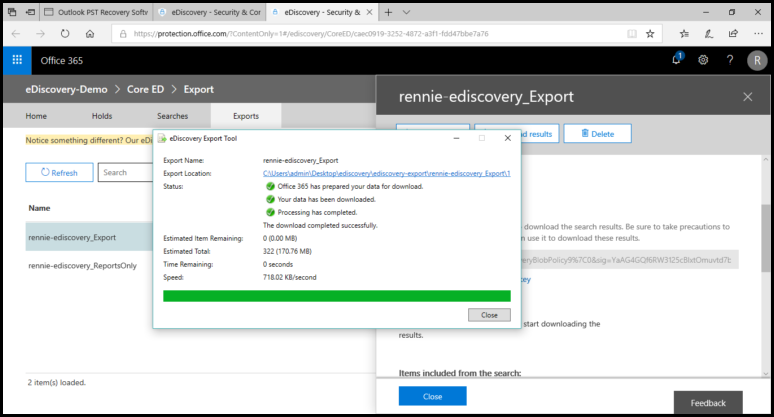
h) Select the destination location where you want to save the resultant .pst file. And then Hit on the Start button.
i) Finally, click on the Close >> Finish button when the procedure gets finished to add Office 365 shared mailbox to Outlook.
Hello all! While I used eDiscovery utility to backup Office 365 shared mailboxes to PST, it seems as if majority of shared mailboxes are missing from the set of results. Whenever I am searching for a particular shared mailbox, no proper result has been generated. I am unable to achieve the export outcome in form of PST file as it seems that operations are hanged. What to do in this case? Any idea?
As discussed above, the eDiscovery solution is not the sole approach to exporting Office 365 shared mailboxes to PST. Of course, its purpose of programming is totally different from what we are doing with it here. Nothing to worry about! Let’s begin with a reliable solution!
Method 2 – Use Professional Software to Export Office 365 Shared Mailbox to PST File
Microsoft does not provide a direct approach through which users can export Microsoft Office 365 shared mailboxes to PST. Still, an alternative in the form of eDiscovery software exists! However, when this solution fails then, the only way to back up O365 shared mailboxes in PST file format is SysTools Office 365 Export software. The whole and sole purpose of launching this product is only to help Office 365 users with an easy export process.
Some Advanced Features of Automated Tools
- Export emails, contacts, calendars, tasks & archive folder from O365.
- Apart from PST, exports data in EML, MSG, MBOX, and PDF formats.
- Comes with a date filter for selective data export.
- Option for exporting Office 365 data with or without an Admin account
- Require admin credentials for exporting shared mailbox data.
- Provides split PST option to create small-size PST files.
Follow the Software Steps to Export Office 365 Shared Mailbox to PST Format:
Step 1. After installing the software, open it on your computer. Choose Office 365 as the source and Outlook as the destination platform.

Step 2. Check the required mailbox items that you want to export from a shared mailbox. Set the date filter for selective data export, if required.

Step 3. Use Office 365 admin account, credentials to login and click on the validate button to validate permissions. Click on the next button.

Step 4. Select the backup folder path to save the resultant PST files. Now choose the preferred sizes of PSR files that you want to export. Click on next.

Step 5. Add users from the source, in order to do this you can use any of these three methods – Fetch users, Import users, and Download Template.

Step 6. Select the shared user account that you want to export and click on the validate button. Once the validation is successful click on the Start Migration button.

Also Read: How to Migrate PST Files to Office 365?
Finally, the Task Accomplished
Even IT experts do not recommend the manual approach of eDiscovery to export Office 365 shared mailbox to PST. Hence, Microsoft clients should prefer the use of the above-mentioned software. Additionally, the software maintains the data integrity and hierarchy of the entire Outlook 365 to local PST file. Which furthermore, helps users to manage their local data in a more convenient way.