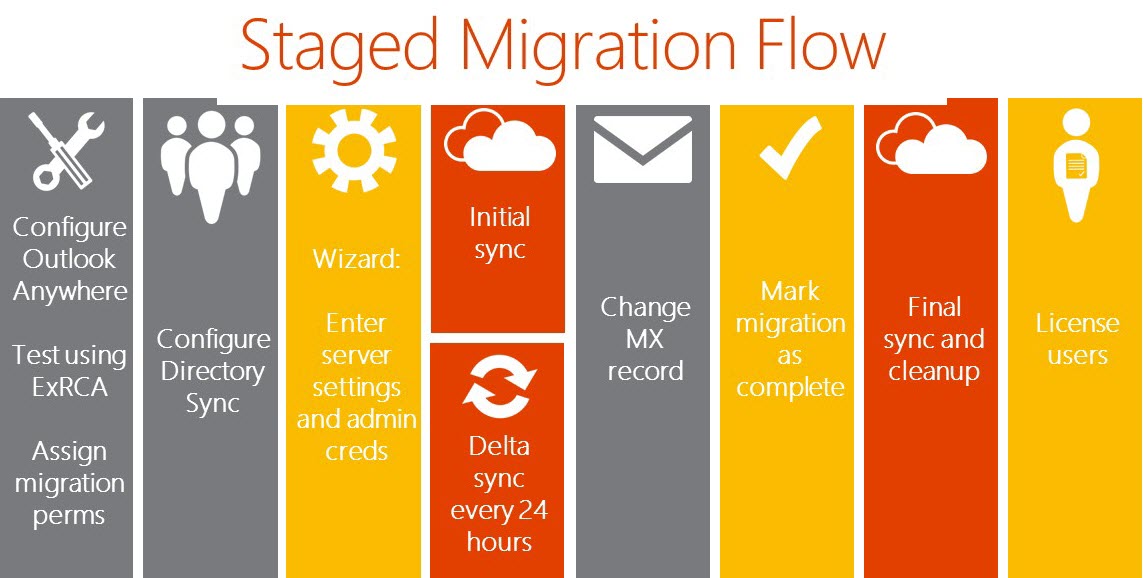
How Does Staged Exchange Migration Works? Let Us See


Utilize migration dashboard either in EAC or Exchange Management Shell for transferring subsets of local Exchange mailboxes and content to the Exchange Online. This kind of migration is known as ‘staged Exchange migration’. It is so because here the migration is performed in batches. If you eventually plan to transfer all mailboxes to Office 365 environment then, you can use this type of migration. It permits you to migrate on-premises mailboxes in batch to the Exchange Online. This blog is going to spread knowledge on how to use staged migration to Exchange Online process.
Restrictions and Requirements for Staged Migration to Office 365
- Staged migration cannot be used to migrate mailboxes from Exchange 2010 / 2013 to Office 365. You can utilize cutover Exchange Migration to move less than 2000 mailboxes of Exchange 2010 / 2013. For moving more than 2000, you can opt for the Exchange hybrid deployment.
- Replicate the user accounts from Active Directory of the server in Office 365 for Business. Before running the staged migration, first install and then, configure Microsoft Online Services Directory Synchronization tool. When migration gets completed, user accounts will still appear in the on-premises firm and the tool automatically syncs Active Directory of the server with the O365 organization.
- The on-premises Exchange business must be the valid domain for the O365 organization.
Staged Exchange migration only works for the user and resource mailboxes. Other types of recipient like contacts, distribution groups, and mail-enabled users can be uploaded to Office 365 via directory synchronization procedure. - ‘Out of Office’ messages will not be migrated with user mailboxes. In case this feature is enabled just before the migration process, it will be enabled on transferred mailboxes but, ‘Out of Office’ contents will be totally blank. Users who are sending emails to that particular mailbox will not receive the notification of ‘Out of Office’. The mailbox user needs to recreate ‘Out of Office’ feature for enabling it after the migration process.
Working of Staged Exchange Migration
The following described instructions need to be followed by the Exchange administrator and migration procedure needed to be performed at the Exchange Online end :
- A CSV file needs to be created by admin, which comprises a row whose on-premise mailbox will be moved in the batch migration
- Use Migration dashboard to create and start the staged migration either in Exchange management shell or EAC
- Following activities start taking place in the Exchange Online environment :
- Check that Directory synchronization is active
- Verify that mail-enabled user appears in the Office 365 business for each of the user listed in CSV file. Mail-enabled users are developed in O365 as the outcome of directory synchronization procedure
- Here comes the step of conversion, which is termed an initial synchronization. Exchange Online is having a capability of processing N number of migration requests simultaneously. ‘N’ represents the maximum concurrent migration number, which an administrator mentions at the time of migration endpoint creation used for batch migration. In default settings, initial synchronization takes place over 20 mailboxes at a time until and unless all mailboxes in the migration batch have been transferred.
- Now it is the time to configure mail forwarding settings. This can be performed by ‘TargetAddress’ property over the on-premise mailbox, having O365 mailboxes email address. This states that the mail sent to the server mailbox automatically gets forwarded on the corresponding mailbox of the O365.
- When Step (3) gets completely finished, a process status email is sent to the Exchange Online administrator. The message defines the number of mailboxes successfully migrated and not migrated. It also comprises of links to migration statistics and the error report that comprises of descriptive details. At this stage, users can be permitted to work with Exchange Online mailboxes.
- Being the initial synchronization part, Exchange Online migrates contacts, calendar, and email messages from the local server to the cloud storage. A final migration report is sent to admin, addressing that migration is completed.
- Administrators can convert mailboxes of on-premises in batch migration into the mail-enabled users. After this, they will create and start extra migration batch that submits CSV file for each user.
- At this step, you are all done with migration from on-premises mailboxes to Exchange Online. You can enable users to work in the Office 365 environment.
Alternate Solution of Staged Office 365 Migration
The manual procedure explained in the above segment is so time-consuming and complex. Users should have technical knowledge or need guidance by a person who is technically sound. There might be some scenarios where users cannot get a trusted and reliable person who can carry out the task. In those cases, we have come up with a best solution which will help you to export your data with 100% precision.
It is considered as the best alternative of Office 365 Staged migration as it has simple user interface which eliminates most of the complexities. Moreover, it is much simpler to use and doesn’t require any hardcore technical knowledge. Moreover, users can try the demo version of the tool on their Windows OS for free and try all the features before purchasing licensed version.
Simple 5 Step Working of the Tool is Explained Below:
- Launch tool on Windows OS and select migration platforms.
- You can use date-range filter and select / deselect emails, calendar or contacts if you don’t want to export them to destination account.
- Fill all the essential Exchange details in the screen shown below.
- Validate Office 365 Admin account by providing Admin ID and Application ID.
- Click on Start Migration button to initiate the process.
Conclusion
Staged Exchange Migration is a free approach to upload on-premises content to Exchange Online. If you are an administrator and well-known with the Microsoft Exchange server technicalities then, for sure this migration solution is the easiest.