Come to Know About Office 365 Data Loss Prevention With its Actions


Do you know the following fact?
Microsoft Exchange 2013 and Office 365 renders the inbuilt feature of data loss protection technique. It enables an organization to secure vital information from being getting leaked through email messages, or from being communicated via electronic mails. In this post, we are going to illustrate solution on how to enforce Office 365 data loss prevention feature in a tenant. Also, you will find an action taken by DLP when it detects something suspicious on its activation.
Let Us First Create DLP Policy in Office 365
First of all, filter out the data that is essential from company point of view. This data will be the one which on leakage directly or indirectly impacts business growth and overall reputation. Office 365 data loss protection approach will provide strong security to this type of data. Now its time to create DLP policy using following instructions :
1. Login into your O365 admin account and go to Admin Centers >> Security & Compliance
2. This loads a Security & Compliance web page in which you have explore the data loss prevention menu and select Policy >> Create a policy button
3. A new wizard gets opened in front of you. Select the ‘category of industry regulation’, showing the regional and country-based requirements
4. Perform mouse click on Financial and choose the desired country / region to go through the respective policy description
5. Click on Next button to proceed further with creation of Office 365 data loss prevention in your account
6. Type the name of new data loss protection policy in Name text field and give a short description in its respective area
7. Determine the location where you want to activate DLP by clicking on All Location or picking up any of the one locations. ‘All Location’ option includes SharePoint Sites, OneDrive environment, and Exchange email
8. Click on Next after defining the path for Office 365 data loss prevention. Now its time select whether you want to go for DLP Simple properties or for DLP Advance properties
- Extra or customized rules cannot be defined in Simple properties. It offers all basic business cloud security standards.
- A rule editor is provided to clients under the Advance properties. You can customize the predefined data control settings.
9. Hit on Next and then, mention the warning instructions for end users of your account. Create an alert feature to share business content for defining the total number of times a document can be shared. Being an administrator, it is your responsibility to decide whether you wish to block officials from sharing business documents or not. Remember one thing that you are making decision wisely by keeping all aspects of cloud security challenges and risks in mind. Click on Next to proceed
10. Three different options will appear in front of you. Read all the options carefully and then, enable the radio button of anyone of the three options and click Next
11. You are done with defining of O365 DLP policy settings in your tenant. Now activate the newly programmed policy by clicking on Create button
Done With O365 DLP Creation, Time to See Its Action
You can observe the action of Office 365 DLP both in Outlook on Web App and MS Outlook 2013 / 2016. Since we have explained procedure of creating policy in O365 so, now we are going to illustrate an example using Outlook mailing client. This will help you learning that activating DLP standard in any of the accounts is worthful. Also remember that actions in both these email clients will be based on the properties defined by account administrator.
We are going to illustrate an example to demonstrate Office 365 data loss prevention functionality. Suppose an organization has imposed DLP policy to secure credit card details from external leakage via email. This policy is defined in a way that employees can share credit card records within the workstation network, but not on external network.
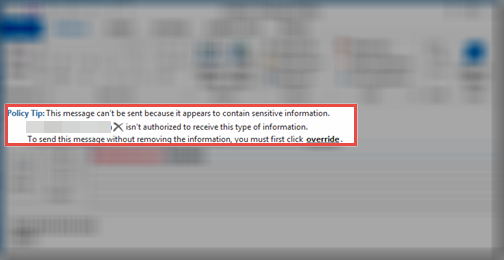
Well, coming back to the example, when an individual (whose user account is linked with organization admin tenant) tries to share credit card information outside the network it restricts him from doing so. You can have a look on following screenshot.
When the employee to ignore the message and directly click on Send button, a warning dialog box appears.
In this way, cloud DLP in Microsoft Office 365 or Outlook 2013 / 2016 helps in sharing of business data through email communication.
That’s All For the Day
Cloud computing security is essential to achieve for all types and size of enterprises worldwide. It helps them to make best use of online technology by ensuring protection to their content, stored on cloud storage. Microsoft takes its cloud storage security a serious concern, which can clearly be seen by introducing of Office 365 data loss prevention feature. Now its time for customers to take cloud information protection seriously and activate this inbuilt feature in their tenant to prevent breaching of sensitive records.


