Office 365 Cutover Migration Step-by-Step Guide


Being the part of Office 365 deployment, you could demand migration method to move data from source email system’s user mailboxes to O365. The collective procedure of doing entire migration task is termed as Cutover migration. Office 365 cutover migration is recommended in following cases :
- The recent on-premises Exchange enterprise is MS Exchange Server 2016, 2013, 2010, 2007, or 2003.
- There exist 2,000 or fewer mailboxes in the on-premises Exchange infrastructure.
Prerequisites to Be Fulfilled Before Cutover Migration
A proper blueprint is required to attempt Office 365 cutover migration process in a step-by-step manner. Consider following things before you start will the actual procedure :
- Transfer complete official work in Office 365 over a few days and then, hold user accounts in Exchange Online premises.
- To achieve fast migration procedure with a successful result, we suggest you move only 150 mailboxes at a time.
- The name of the primary domain that is accessed for your on-premises Exchange business account must be present in Office 365 admin account as a domain.
- Ensure that the source Exchange server is updated with its latest features and services packs.
- Once the procedure of cutover email migration to Office 365 gets completed, each individual of on-premises Exchange mailboxes will be like a new O365 user. However, still, the admin role is to assign the licenses to employees whose mailboxes are moved.
Stepwise Procedure to Perform Office 365 Cutover Migration Steps
1. Login into your Microsoft Office 365 admin portal and click on Recipient >> Migration tab
2. Click on the More icon and then select Migration endpoints option to cutover migration steps Office 365
3. Click on the Add icon for creating a new endpoint and on the first page, enable the radio button of Outlook Anywhere. Click on Next for further proceedings
4. In Exchange Server text box, mention the email address of anyone of the mailboxes, which is to be imported via cutover email
5. Mention the domain account credentials of the user whose email address you have added in Step (4) and is having admin privileges on the on-premises server.
6. Enter the FQDN, which is responsible for the Exchange server hosting. After this, define the RPC Proxy server, which is the same as the source Exchange server in majority cases. This step is required for the endpoint confirmation procedure in Office 365 cutover migration.
7. Now release yourself from all the mental stress and ensure that Outlook Anywhere is working perfectly. You need to check all the parameters wisely and in a concentrated manner by dedicating proper time for this.
8. When the verification procedure gets completed, you will find that Microsoft Office 365 is successfully establishing the connection with Exchange server. Click on Add icon of the Migration screen and then, select Migrate to Exchange Online option from the appeared menu.
Now simply go through the entire prompting windows and provide the data required on each window. Once you come to the end of these windows, copying of data automatically gets started. Wait for a while and then, you will find a progress status screen on same Office 365 webpage. If things go completely well then, the status of process completion will appear in the form of a successful message statement. At this time instance, you can break the DNS records and allocate licenses to the employees. From the ‘Active’ users, if you are having a mixture of E3 Business Essentials and Premium then, assign the licenses one-by-one. Also, you can exhibit bulk actions for the same.
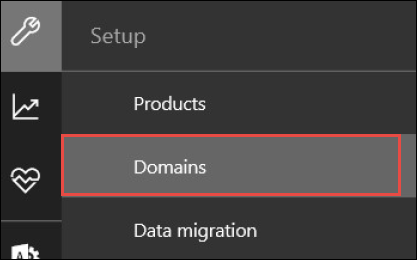
Well, in order to modify DNS records, open the setup menu from the left sidebar and then, open the domains.
After this, go through below-mentioned instructions to continue with an advance step of Office 365 cutover migration :
a) Enter the extra DNS records along with the provider details, present on the page portal.
b) Be known from a fact that the changes will be reflected completely in an account after 24 hours because of the global propagation procedure.
c) During the current time period, things might not work properly. Email delay kind of issues might take place but, nothing can avoid this.
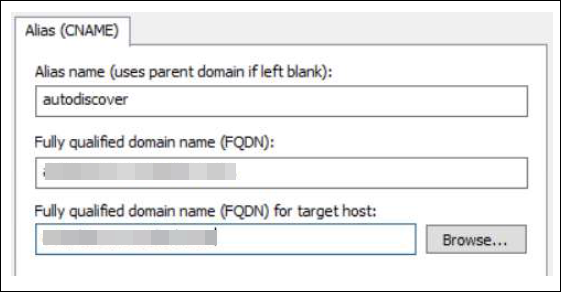
At this point, you can ask your business officials to start working with their new O365 mailboxes via smartphones or web browser. For local users, ensure that DNS entries, which are pointing towards web domain are up to date. Once the Exchange gets uninstalled from the server, check that autodiscover records are replaced with new CNAME records. These records will be a point from autodiscover. to autodiscover.outlook.com.
Verify that not even a single data is left behind after uninstallation because this might lead to issues with auto discover service. Clean up all your AD schema just after the uninstallation procedure.
Time to Wrap Up
Office 365 Cutover migration process enables administrators to move Exchange mailboxes in Exchange Online tenant. It provides officials with a new online platform to work in a flexible manner for their company. After completely moving data in Exchange Online account, administrators can uninstall the on-premises server and continue using Microsoft cloud for their work.
Check More Similar Posts:


