Get Guidance on How to Set Outlook Rules to Run Automatically


Don’t make your email client inbox folder a cluttered mess. Give a chance to Microsoft Outlook to help you in ruling the inbox instead.
It is important to be an intelligent and smart organizer to become an attractive communicator. The same thing applies to the folders of Microsoft Outlook 2016 / 2013. An unsystematic type of inbox storage decreases the client’s ability to communicate and integrate. Here comes the solution on how to set Outlook rules to run them automatically without any human interruption. This rule defining procedure will enable a Microsoft Office customer to work in an organized and systematic manner.
First We’ll Learn About MS Outlook 2016 / 2013 Rules
Outlook rules is a way of automating the actions in Outlook email client, which can even be performed manually by PC users. A rule is an action that is performed in the case when an email matches the predefined criteria. Suppose you receives bundle of invoice emails from several vendors then, you can automate the process of sorting by setting an Outlook rule to store email automatically in the destination folder.
Now Let’s Us Get Solution on How to Set Outlook Rules
There exists three different ways to create rules in Outlook 2016 / 2013 and they are listed below :
1. Create an Outlook rule via existing templates
2. Define a new or customize the existing one
3. Create a rule from an Outlook mail
First, you need to decide the method through which you want to define Outlook rules. After this, execute steps of the chosen approach that are mentioned below.
Approach 1 : Create Rules in Microsoft Outlook Via Existing Templates
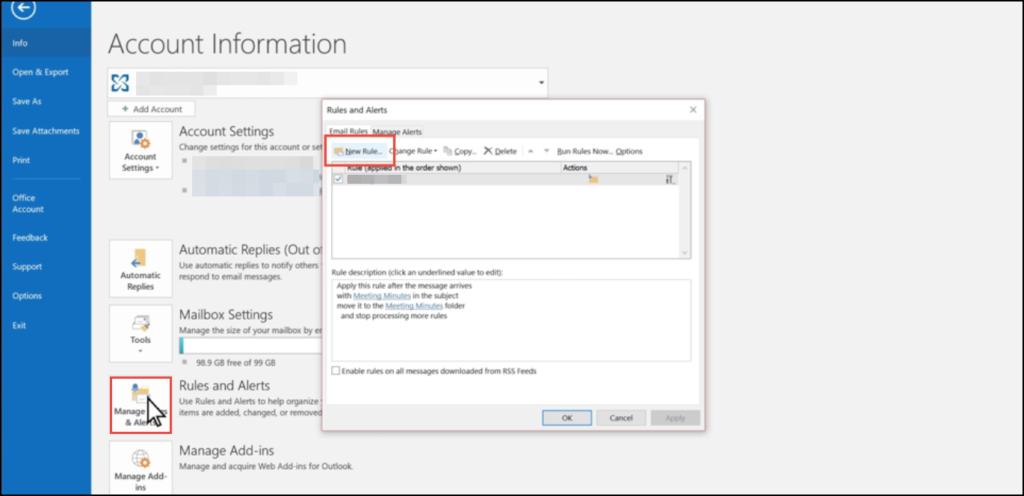
1. Click on File >> Manage Rules & Alerts >> New Rule
2. Choose the template from displayed list. For example – we are choosing ‘Flag messages from someone for follow-up’ to flag an email
3. Modify the description of rule by clicking on the underlined value
4. Click on Next to continue setting of Outlook 2016 / 2013 rules
5. Choose the condition based upon defined set of rules and proceed to next step
6. Add the relevant content in the text box and then click on OK >> Next
7. Click on the Finish. Hit on OK, if you encounter a warning message dialog box
Approach 2 : Define A New Or Customize The Existing One
1. Open Microsoft Outlook 2016 / 2013 email app on your system and click on File >> Manage Rules & Alerts >> New Rule
2. Under the section of ‘Select a template’, go to Start from a blank rule sub-section and choose anyone of the two listed option
3. Click on the Next and go to ‘Select condition(s)’ for choosing exceptions, which you desire that emails should fulfill at the time of rule matching.
4. Locate towards ‘Edit the rule description’ field and then click on the blue colored underlined value to set Outlook rules 2016 / 2013 by modifying them
5. Hit on Next and navigate towards ‘Select Action(s)’ area to select the action you want to take on the matched emails
6. You can define the value of actions by clicking on blue colored underlined text in ‘Edit the rule description’ field
7. Click on Next to impose the exceptions to drafted rule
8. Go to ‘Edit the rule description’ area and enter any value by clicking on the interlinked text
9. Define the name of new rule in Finish Rule Setup text box
10. Either select or deselect the setup rule options for executing the action of newly created rules on existing Outlook emails, activating or deactivating the rule, or applying rule on all accounts.
Approach 3 : Create a Rule From An Outlook Mail
a) Choose an email from your Outlook inbox or sent items.
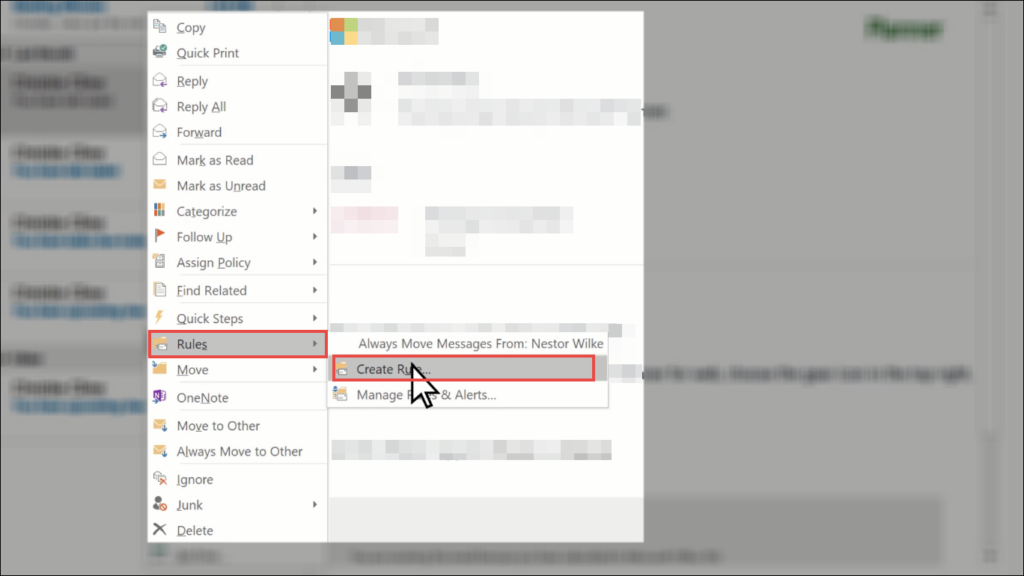
b) Right-click on the chosen mail and select Rules >> Create Rule.
c) Choose a situation and then, define actions need to be attempted on emails that match the condition to set Outlook rules
d) When you are done which setting of Outlook 2016 / 2013 rule via an email message, click on OK to activate it
e) If you want apply this newly created rule on the existing emails of current folder, check the checkbox of ‘Run this rule now……’. and then, Hit on OK button. Otherwise, you can also directly click on the OK without checking the checkbox
Finally! Its Done!
Three different solutions on ‘How to set Outlook rules to run automatically’ is provided in this informative post. You do not have to contact to any expert or tech support executive to defined Outlook rule in your email client. It is simple and easy to do the same with help of stepwise process rendered in this article. To make things easier, we have provided you solution with screenshots of instructions given in each approach.


