How to Move Document Library in SharePoint? Get Tutorial on It


“According to my experience of working with SharePoint, I tried to move files from one location to another by drag-and-drop method. But, I realized that this is possible and I panicked for a while. Then, I tried to save the SharePoint document on my machine desktop and upload it to the targeted location. Unfortunately, the same method failed. With a hope that the tech experts here, will provide me in giving solution on ‘How to Move Document Library in SharePoint 2010’, I am posting my query. I show my thanking gratitude in advance for the help!”
Many Microsoft technical forms, social networking sites, etc., are crowded with the users’ query asking for the solution to move the document to another location in SharePoint. A team of SharePoint expert worked upon the same and rendered a workable solution to this.
Steps to Migrate Document Library in SharePoint
Following are the steps that needs to be implemented in SharePoint to accomplish the task :
1. Open the Document Library in SharePoint and move the mouse pointer towards the file, which is to be migrated. Once you find the source document, put a check mark on the left-hand side of it.
2. Click on the Open menu for selected item icon of the selected file to open a list of actions.
3. This opens a small preview window of the selected file in which you again have to click on the More Actions icon
4. A list of several actions will appear where you have to choose Copy option. This will continue the process of migrating Document library in SharePoint
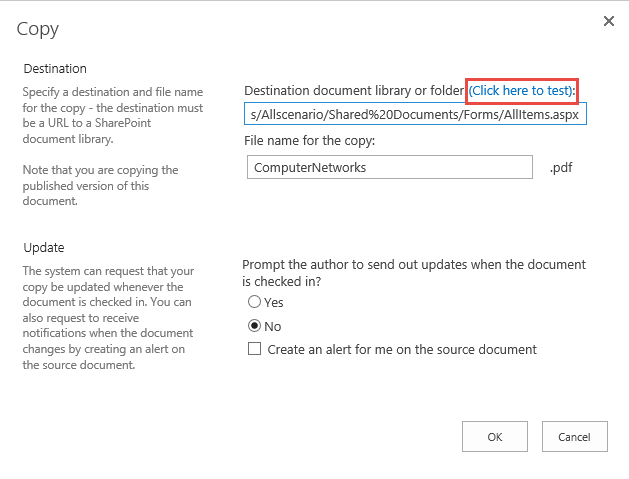
5. This will open a Copy dialog box. In the Destination document library or folder field, you have to mention the URL of destination where file is to be moved.
6. After mentioning the location, click on Click here to test link. This will check that whether you are sending file at the right location or not.
7. A new tab gets opened that will show the destination location where the file will be moved at the end.
8. Close the current tab and come back to the Copy dialog box. If you want to change the name of the source file then, you can do it in the File name for the copy field.
9. If you want to prompt the author to send updates when the document is checked in and want to create an alter then, you can apply these settings on the same dialog box.
10. After making all the desired changes, click on OK in the copy dialog box. This will initiate the process of migrating document library in SharePoint.
11. If you are sure that you are ready to move the selected file then, click OK to give your confirmation.
12. When the process successfully gets finished, a Finish Status will appear in front of you.
13. Now open the destination URL that you have mentioned in Step (5) to see the moved document.
Conclusion
How to move document library in SharePoint – the answer to this question is explained with each and every instructions. Users can implement these guidelines and fulfill their task because of which they were migrating files from one location to another. If in case you get any problem to migrate document library in Sharepoint, then feel free to contact us.


